Thursday, October 22, 2020

Bluetooth Mesh fog machine

A fog machine can greatly affect the ambience of Halloween displays but unless you invest in an expensive one they can be impractical. The machines that pop up around the holiday must be plugged in to the wall, are not weatherproof, and have relatively small "fog juice" reservoirs. Requiring AC power isn't uncommon for Halloween decorations and they are often installed close to the house, under the eaves or porch covering, so workarounds for the first two challenges are familiar. The obvious solution to the fog juice shortage is to only make fog when someone is around to appreciate it -- but how?

Completed build

Why Bluetooth Mesh?

Although standing around for several hours on Halloween night waiting to press buttons on remote controls might be an option for the most dedicated among us, ideally the remote controls would be able to activate themselves -- either in response to motion or the state of other devices. Similarly, running wires around the yard is fine in some situations but wireless communication is usually superior. A decade ago I would have advocated using IR to build a network that essentially consisted of a bunch of TV remote controls and receivers but now inexpensive radios are an attractive option because they:

  • Are arguably easier to work with
  • Don't require line-of-sight (or a convenient reflection)
  • Aren't affected by ambient light or fog
  • Allow bidirectional communication
  • Offer a path to smart device interoperability
The Bluetooth Mesh functionality that Nordic provides as part of the nRF Connect SDK (NCS) offers all of the advantages of using a radio plus one more that makes it especially interesting for a Halloween display: the behavior of the network can be reconfigured by modifying the devices' publication and subscription addresses using an app, without modifying any firmware. This means that, for example, next year when a second motion detector is added to the display one or more of the devices that used to be triggered by the original motion detector can be pointed to the new one with only a few button presses in the nRF Mesh app (Android or iOS).

Fog machine operation

The main components of a fog machine are a heater, a pump, and a fog juice reservoir. More sophisticated machines can also include features like timers, lights, or chillers but you probably won't find such extravagances on $40 machines like this one.

Fog machine internals

The large block on the right is the heater. The red wires above it are connected to a thermostat that acts as a switch -- it closes whenever the heater drops below a temperature threshold. Insulating material helps the heater stay hot for as long as possible and is visible next to the thermostat, poking out of the enclosure.

The silver cylinder to the left of the heater is the pump. Its job is to pull fog juice out of the plastic reservoir and push it into the heater so it can be vaporized and expelled from the front of the machine.

The entirety of the machine's wiring fits in a single diagram:

Fog machine schematic
When the thermostat is closed the electricity flows through the heater. During these periods the remote control, which connects via the three pins at the bottom of the diagram, is effectively "off." This happens frequently when the fog machine is producing fog because the heat stored by the thermal mass of the heater is used to vaporize the fog juice, causing the heater to cool. It also happens occasionally -- even when the machine is idle -- as the heater radiates heat to the surrounding environment.
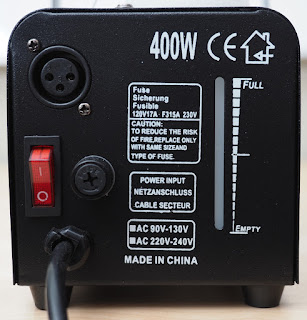
Back panel of fog machine

Wired remote controls typically have a button and at least one LED. An LED that indicates when the machine is currently capable of producing fog is useful because it wouldn't be obvious otherwise.

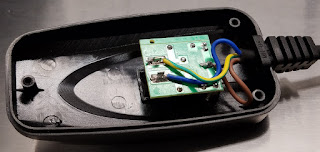
Original remote control internals

This remote has two LEDs: one is on when the machine is capable of producing fog, the other when the machine is currently producing fog.

The original remote is a very simple device:

Original remote control schematic

In summary:

  • When the machine is ready to produce fog the thermostat is open and AC is available to the remote control via the BROWN and YELLOW/GREEN wires.
  • Connecting the YELLOW/GREEN and BLUE wires together powers the pump

Replacing the remote

Nordic's Thingy:52 is a prototyping platform that combines an nRF52832 SoC, rechargeable battery, and a bunch of sensors into a neat little package. Putting a 3V microcontroller in control of the fog machine requires solving two problems:

  1. Detecting the presence of AC to determine that the machine is ready to produce fog
  2. Operating a switch to open and close an AC circuit

The first problem can be solved with the help of a cheap 5V wall wart. By taking it apart and connecting it to two of the wires from the original remote the Thingy:52 will think that it's plugged into USB whenever the fog machine is ready. As a bonus, this will also recharge its battery -- the same battery that keeps it from browning out when the heater becomes active!

5V wall wart

Wall wart schematic

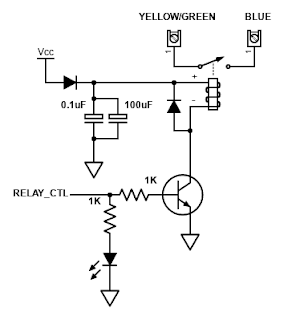
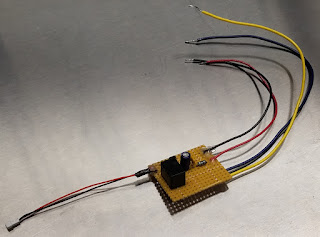
The 5V from the wall wart is also hardwired to an LED on the top of the new remote's enclosure, to replicate the original remote's functionality. This 5V also supplies power to a separate board -- a board that solves the second problem by using a BJT transistor to open and close a 5V relay. This allows a GPIO output from the Thingy:52 to operate the relay, effectively replacing the functionality of the original remote's button.

5V relay schematic

5V Relay protoboard

Manual operation is useful, especially when positioning the fog machine during setup, so a large push button was also added to the new remote.

Button schematic
Finally, an external power switch is needed so the rechargeable battery can be disconnected when the fog machine is in storage. The addition of seven wires, including one from VDD to the external power switch's LED, is the extent of the required modifications to the Thingy:52 itself.

Firmware

The Thingy:52 already has a USB_DETECT pin that is pulled high when 5V is present on the USB port so keeping track of when the fog machine is ready only requires enabling a pin change interrupt on a GPIO. The button for manual operation is handled the same way. Using a GPIO output to control the relay is even easier.

Adding Bluetooth Mesh is also pretty straightforward, at least when starting from the Light Switch sample in NCS. The original Light Switch sample enumerates four Elements, one for each of the LEDs on a typical Nordic development kit. Each Element has a Generic OnOff Server that allows the other devices on the mesh network to read and write the state of one of the LEDs.

The remote control only needs two of these servers:

  1. The server in the first element works like the button. Setting this element to 1 will produce fog until it is written back to 0 or the heater becomes active. It is automatically set back to 0 when the heater becomes active. If the fog machine is not able to produce fog then setting it to 1 has no effect.
  2. The server in the second element is set to 1 when the fog machine is capable of producing fog and 0 when the heater is active. Writing to this element has no practical effect because the written value will be immediately reverted. A client can read this value to determine whether or not the fog machine will be able to immediately produce fog.

The firmware, along with details for provisioning the node, are posted here. The nRF Mesh app is used for provisioning and configuring the node. It also presents a nice GUI that enumerates the Elements and their servers:

The app also allows for interaction with both of the servers. Selecting one of them and then scrolling down leads to a "Generic On Off Controls" widget:

The "READ STATE" button at the bottom does exactly what it claims and the state of the server can be toggled by pressing the "ON" button.


Sunday, August 9, 2020

neRF

The purpose of this project is to augment the Nerf Mega Mastodon blaster with a Nordic nRF52840 dongle, RGB LED, and vibration motor so it becomes fly-by-wire and can optionally be controlled over Bluetooth. Without a Bluetooth connection the blaster's original operation is essentially unchanged.

The finished product, with barely-visible modifications -- a few screw heads and an LED
 

 About

The Mastodon is an interesting blaster because of its unique combination of fully-electric operation and deterministic dart handling. When fully loaded, up to 24 darts can be fired individually without further interaction from the user. The current replacements for the Mastodon either require the user to cock and/or press something to fire each dart (e.g. Ultra ONE) or shoot at an unpredictable rate (e.g. Prometheus MXVIII-20K). A common characteristic that is shared by all of these automatic blasters is a "flywheel" mechanism that throws the dart in a similar fashion to baseball pitching machines. The mechanism that sets the Mastodon apart is a motorized plunger that pushes each dart into the wheels, rotates the drum, and uses a switch to ensure that the plunger motor stays powered until the plunger is retracted (which would interfere with spinning the drum to reload it).

Without a Bluetooth connection the blaster's operation is changed slightly:

  • After firing 24 darts the blaster automatically stops shooting until the triggers are released and pressed again
  • No dart will be fired until the wheels have had a second to spin up
  • An RGB LED on the top of the blaster signals that the wheels have spun up (green), a safety fault has occurred (blinking red), or a Bluetooth connection is active (blue)

Connecting to the blaster via Bluetooth adds the following functionality:

  • The blaster's ammo count can be set so a "ammo remaining" notification will be sent after each dart is fired
  • Three selective firing modes are available: single-shot, three-dart burst, and fully automatic
  • Both triggers can be individually overridden
  • Both triggers can be locked out
  • Haptic feedback can be initiated for a specified amount of time

The blaster's safety mechanisms still function normally. Attemping to fire when either of these conditions is present will result in a safety fault:

  • The jam door is open
  • The drum is removed

If a safety fault occurs then the LED will blink red for 30 seconds before the blaster turns off. Rectifying the fault condition and pressing the triggers will reset it. The safety features can be disabled during development via CONFIG_NERF_SAFETY_FEATURES_ENABLED in the project file. The firmware for the project can be found here.

Although the blaster's wiring has been changed significantly, the original switches and triggers remain. The only modifications to the plastic housing are holes that were drilled to mount two PCBs (via standoffs), a vibration motor, and an LED. The bipod in the photo is off-the-shelf and attaches to the blaster's "tactical rail" using a picatinny rail adapter.

Original hardware

There are a couple of videos online that show how to rip out the blaster's internals and replace the two trigger switches with ones that can handle LiPos. That approach allows the blaster to shoot harder and faster, at least until the motors fail, but has the disadvantage of disabling the mechanism that ensures that the plunger is always retracted back to a known position. The point of this build is to add remote control while retaining -- and appreciating -- the blaster's original design.

Pro tip: the battery door has four sections, one for each size of screw. Use a bit of colored tape to mark each screw hole during disassembly to make life easier later.

Original wiring, including harness coloring
The blaster's original wiring is pretty straightforward. The only tricky part is the trigger override -- the gray wire -- that overrides the plunger trigger until the plunger has retracted. The configuration of the passives around each of the motors is a rough approximation.

A close-up of the motor passives
The two triggers are configured so that the "rev" trigger, that powers the "fly wheels", must be depressed before it's physically possible to depress the trigger that powers the plunger.

Two triggers: "rev" at the bottom and "plunger" above it

The "fly wheels" sit at the front of the blaster. When a dart is shoved into the passage between them the wheels catch it and throw it out of the barrel.

A little silicone curtain (on the left) covers the entrance to the "fly wheels". The tip of the plunger can be seen on the opposite side of the gap.

The plunger mechanism is self-contained and the plunger motor pokes through the top cover so it can engage the gearbox below. The orange switch to the left of the motor is engaged by a ridge on the plunger.

The motor, spring, and switch of the plunger mechanism are visible when the cover is installed

Removing the cover exposes the plunger itself along with its gearbox

A raised ridge runs along the length of the plunger. The ridge is low along the section that engages the switch when the plunger is extended far enough to obstruct the drum. This allows the switch to override the plunger trigger in case it is released while the plunger is extended.

The large cog on the left has a section with no teeth. This allows the plunger motor to remain on constantly even when the plunger is being retracted by the spring; the cog that engages the plunger is momentarily allowed to spin backwards while the large cog continues to spin forwards.

The firmware synchronizes to the output of the plunger switch to ensure that the plunger is always returned to the proper position after the trigger is released.

Output of plunger switch when firing at 8.5V

Additional hardware

The original switches were retained but now they are routed to an nRF52840 dongle that is mounted on a simple PCB.

The microcontroller lives on a very simple PCB (voltage regulator not shown)
 
The finished product, minus the protective heatshrink

A simple trick that makes it easy to solder headers onto the dongle

The USB contacts of the Nordic dongle protrude far enough from the side of the board to allow it to be plugged into a PC for reprogramming.

The original motors were also retained but now they are driven by a quad, half-bridge driver.

This is an older driver but it's TTL-compatible and easy to use

The populated driver board

JST headers were used to so the two boards are removable. 

Heatshrink makes everything better
The inputs and outputs are labelled for easier assembly

The two boards were installed using standoffs. The modifications to are barely noticeable given the blaster's aesthetic. 

The driver board is not visible because it is installed underneath the plunger mechanism. The vibration motor is located a few inches to the left of the triggers.

An inexpensive bipod is the most elegant way to stabilize the blaster for remote operation. A plastic adapter was used to allow the picatinny bipod to attach to the blaster's proprietary rail.